![]() microsoft word logo primary resized" width="1024" height="685" />
microsoft word logo primary resized" width="1024" height="685" />
Can Microsoft Word read to me? Yes, it can. There are three ways to accomplish this task: The Speak and Read Aloud features in Word, or the Narrator feature in Windows.
The Speak feature was incorporated into Microsoft Office (Word, Outlook, PowerPoint, etc.) back in version 2003. It was called Text to Speech (TTS) then, and it functioned much the same as it does now. Fortunately, it’s a very simple procedure to set up and use, so you can get started immediately.
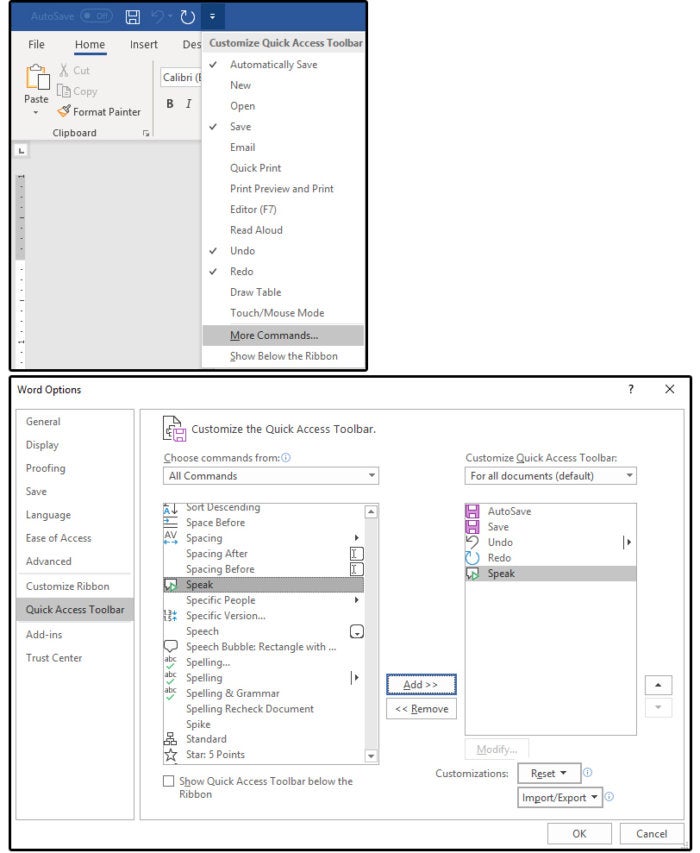
1. Click the Customize arrow on the Quick Access Toolbar.
2. From the dropdown menu, select More Commands.
3. Go to Word Options >Customize the Quick Access Toolbar and locate the Choose Commands From box. Scroll down to the Speak command.
4. Select the Speak command, click the Add button in the middle of the screen, then click OK.
5. Word adds the Speak command to the Quick Access Toolbar at the end, and you’re ready to go.
1. Ensure that your system’s speakers or sound devices are turned on.
2. Highlight a paragraph of text, then click the Speak command button.
3. Word reads any text that’s highlighted, even the entire document. Press Ctrl+ A to select the entire document.
4. Click the Speak command button once to begin the reading session, then click it again to stop. There is no pause-and-continue option at this time, but many users have requested this feature, so we hope to see it in future versions.
1. Another way to have your text read aloud in Word is to select the Review tab > Read Aloud button.
The greatest benefit of Read Aloud as opposed to the Speak command is…
(a) You don’t have to highlight the text. Just position your cursor where you want the reading aloud to begin and click the Read Aloud button.
And (b), when you click the Read Aloud button a second time, it stops. Click the button again to continue from that point on. So, essentially, you have a Pause feature with Read Aloud that is not available with Speak.
The Speak preferences are defined in Widows, not in Word specifically.
1. Click Start > Windows System > Control Panel
2. Select Ease of Access > Speech Recognition > Text to Speech, and the Speech Properties dialog window opens on the Text to Speech tab.
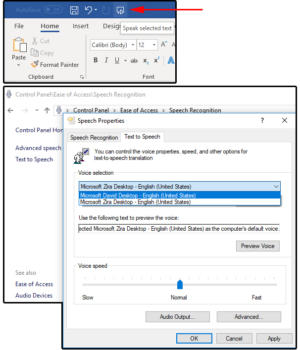
3. Under Voice Selection, choose MS David Desktop for a male voice or MS Zira Desktop for a female voice.
4. Click the Preview button to listen to each voice, then make your selection.
5. Use the slider under Voice Speed to adjust the pace (slow, normal, or fast) of the reader.
6. Click the Audio Output button to define the Sound preferences.
7. Click the Advanced button to select or change the output device.
Windows 10 Narrator is an accessibility feature designed for vision-impaired users, however, anyone can use it. It reads everything onscreen: documents, websites, comments, page instructions, commands, and more. It’s also not restricted to Word, as the Speak feature is.
Using Narrator is really easy, though learning all the commands may take some time. See Microsoft’s “Complete guide to Windows Narrator” for full information. (If you search elsewhere online for WIndows 10 Narrator help, check the date of the article and the Windows version before you start memorizing commands.)
There are two keyboard layouts available: Standard and Legacy. The default is Standard. Follow these instructions to change the keyboard (which changes how the commands function). For more information, go to Microsoft’s support page about Narrator keyboard layouts.
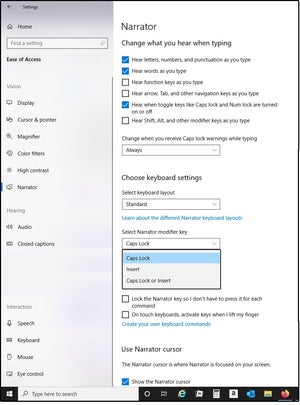
1. Right-click the Windows Start button and select Settings.
2. Select Ease of Access.
3. Click Narrator in the left panel.
4. Browse to Choose Keyboard Setting.
5. From the Select Keyboard Layout field box, choose Standard or Legacy.
6. Next, select your Narrator Modifier key (that is the key used to activate the Narrator commands). Options include Caps Lock, Insert, or Caps Lock and Insert. I chose the Caps Lock key, because its location on the keyboard is more efficient.
7. Once you have chosen the Narrator Modifier key, the instructions here and on the web will refer to that key as the Narrator key (or, in some cases, the SR key).
8. Exit the Settings menu.
The basics for using Narrator are this:
1. Press Windows logo key + Ctrl +Enter (simultaneously) to access or exit Narrator.
2. If you have not memorized all the “reader” keystrokes yet, the easiest method to read text is to place your cursor on the target word/sentence/paragraph and press Narrator key + Down Arrow. Press Narrator key (by itself) to stop, then Narrator key + Down Arrow to continue. There are other keys that perform this same function, but these are the easiest.
3. Most important: For a list of all the Narrator commands, press Narrator + F1.
4. For reading the current paragraph, press Narrator + Ctrl + K.
5. For the next paragraph, press Narrator + Ctrl + L.
6. For the current page, press Narrator + Ctrl + I.
7. For the next page, press Narrator + Ctrl + O.
The list goes on and on. In addition to the complete guide above, check out the support pages for Windows 10 Narrator keyboard commands and touch gestures, and Windows 10 narrator reading text.